LiveScopes.tv Getting Started
Getting started with LiveScopes.tv
Requirements
LiveScopes.tv is a currently Windows only software and is relatively GPU intensive but otherwise pretty lightweight. The following are the minimum requirements to run LiveScopes.tv:
- OS Windows 10 or newer
- CPU 4 cores using the x86_64 architecture
- RAM 2GB of free memory
- GPU Starting with version 2.0.0 of LiveScopes.tv, OpenCL is used for image processing. This means that a GPU with OpenCL support is required. This includes most modern GPUs from AMD, NVIDIA and Intel. Even iGPUs work. If you are unsure if your GPU supports OpenCL, you can just try to run the software. If it doesn’t work, you will see an error message.
- Network The free version only supports NDI® sources. This means that you need a network connection to receive NDI® video feeds. NDI® works best with a wired connection but can also work over WiFi.
Note that the better the GPU, the better the performance of the software. For example, a modern NVIDIA RTX 3090 will be able to process 4K video feeds at 60fps while an older Intel iGPU might only be able to process 1080p video feeds at very low framerates.
The software is built in a way to still work with low-end GPUs. It should not crash or freeze but the amount of frames that can be processed per second will be lower.
Installation
Download the latest installer from the LiveScopes.tv download page.
Note that any other site claiming to offer a download of LiveScopes.tv is not legitimate and may contain malware.
After extracting the .zip file, run the installer and follow the on-screen instructions. Windows might warn you that the installer is not signed. This is because at the time of writing we are still in the process of getting the installer signed. You can safely ignore this warning.
It is recommended to uninstall any previous versions of LiveScopes.tv before installing a new version although this is not strictly necessary.
You might see the following warning when starting LiveScopes.tv for the first time:
The following files are corrupted or missing: [list of files] Please UNINSTALL and then reinstall the application. Reinstalling without uninstalling first may not fix the issue.
This message appears when the software found support files that don’t match the version of the software. This can happen when you install a new version of the software over an old version. In this case, you should uninstall the software and then reinstall it.
Window Overview
When you start LiveScopes.tv, you will see the following screen:
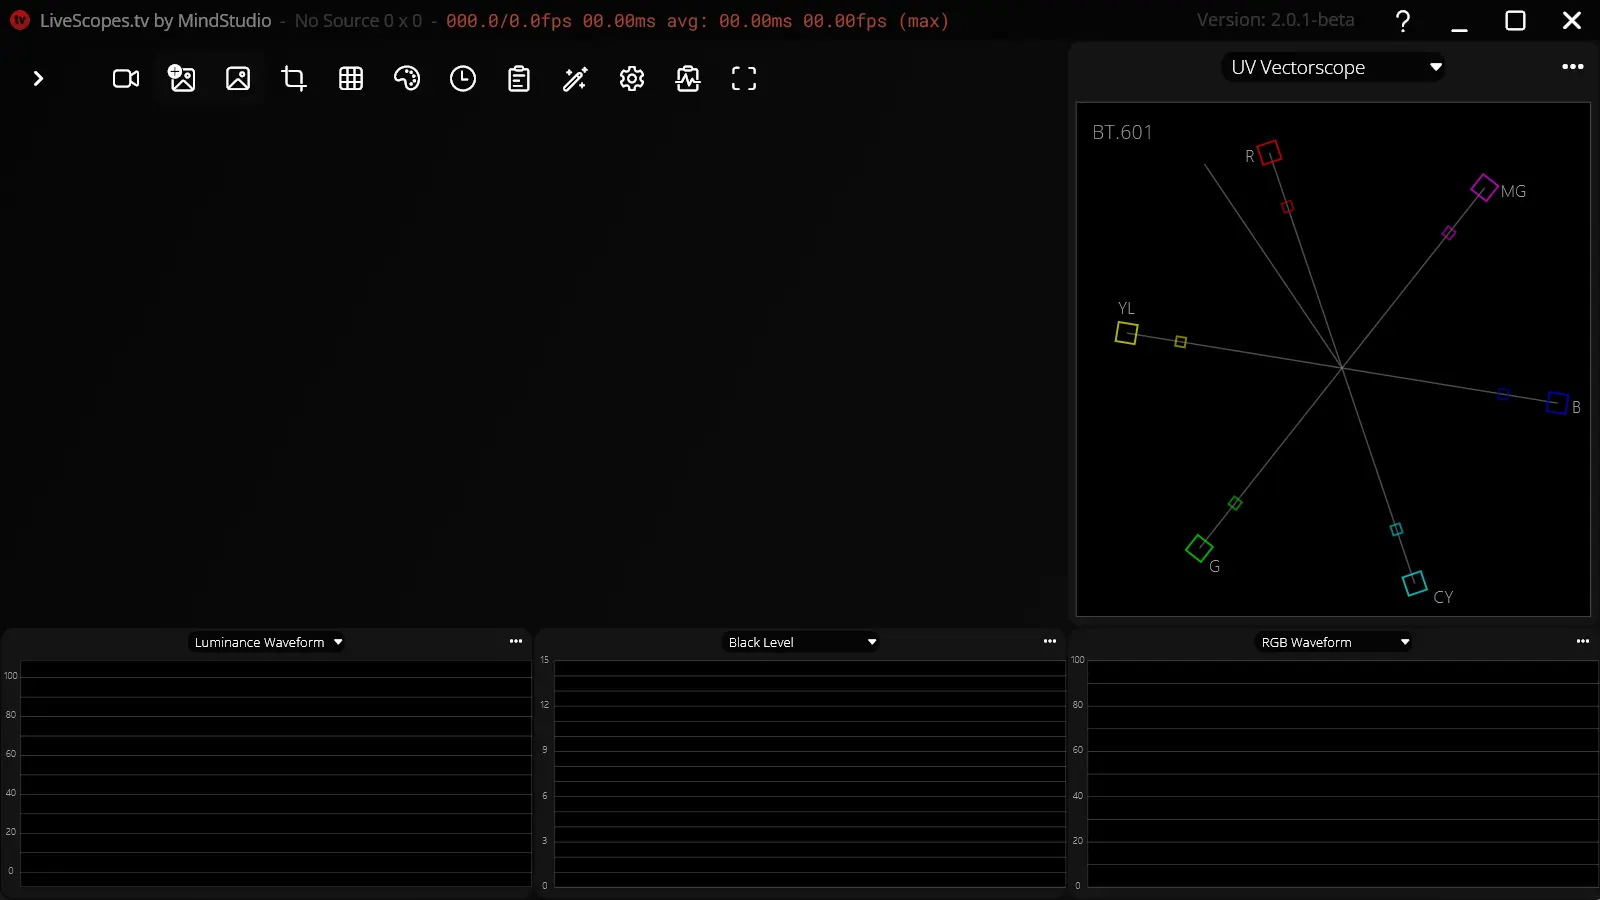
Starting at the top we can see the window title and the tool bar.

Window Title Stats
The window title contains the name of the currently selected live video source as well as its resolution. Next to the source there are different metrics that show the current framerates and render times:
<actual FPS>/<reported FPS>fps <render time/latency>ms avg: <average render time>ms <average maximum FPS>fps
These metrics are useful to determine if the software is running smoothly and if the hardware is capable of processing the video feed.
Note that in some cases the actual framerate is different from the reported framerate. This can happen when the video source is not sending frames at the same rate that is reported in the metadata and is not always a sign of a problem.
For example, the NDI® Test Patterns generator sends frames at 1fps but reports the framerate as whatever is set in the generator user interface. Sometimes some webcams also send fewer frames when the lighting conditions are not optimal and higher exposure times are needed.
The render time shows the delay between the software receiving the frame and displaying the processed frame in the UI. For modern GPUs this latency is expected to be around
5-10msat 1080p, resulting in max.100-200 fps16-40msat 2160p, resulting in max.25-60 fps
Toolbar
The toolbar is the main way to interact with the software. It can be collapsed by clicking on the arrow on the left side of the toolbar. The toolbar contains the following buttons:
 Select Source - Opens a dialog to select the video source or stop the current source.
 Capture Reference Frame - Captures and saves a reference frame to compare the current frame to. Captured frames can be found in the frame browser.
 Open Frame Browser - Opens the frame browser to select a reference frame to compare the current frame to. The following buttons appear when a frame is selected:
 Disable Reference Frame - Disables the reference frame comparison.
 Split Horizontal/Vertical - Splits the screen horizontally or vertically to compare the reference frame to the current frame.
 Flip Horizontal/Vertical - Flips the side of the reference frame.
 Rectangle Mask - Enables/disables a rectangle mask to crop the video feed. This is useful whenever you want to check the colors of a specific area of the video feed e.g. skin colors, green screen colors, or white areas.
 Reset Mask - Resets the mask to the center of the video feed. (Required whenever the mask happens to be off-screen e.g. after a resolution change)
 Alpha Background - Toggles the alpha checkerboard background. This is useful to check if the software is processing the alpha channel correctly.
 False Color - Toggles the false color mode. This mode colors the video feed based on the brightness of the pixels. This is useful to check if parts of the video feed are exposed correctly.
 Timecode - Shows the current timecode embedded in the video feed.
 Show Metadata - Shows the metadata embedded in the video feed. (Source Name, resolution, framerate, etc.)
 Color Filter - Opens the color filter menu where a color filter can be applied to the video feed. You can select from presets or create your own filter from a 4x4 matrix.
 Settings - Opens the settings dialog.
 Logs - Opens the logs dialog. This is useful to check if the software is running correctly.
 Fullscreen - Toggles fullscreen mode.
Select a Source
When clicking the Select Source button, the following dialog will appear:
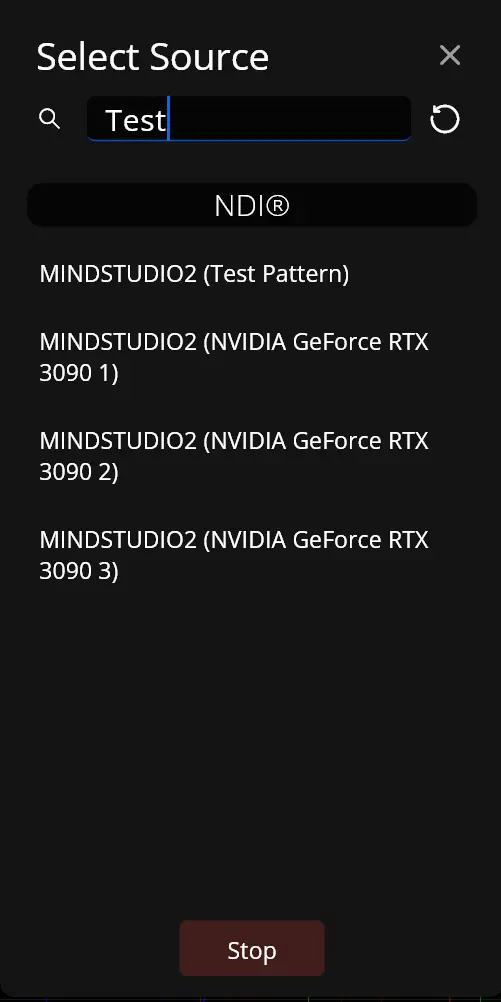
In this dialog you can select the video source you want to open. You can also stop the current source by clicking the Stop button at the bottom of the dialog.
The source dialog also has a search bar that will sort the sources based on the search term. As you can see in the picture, the search term Test will move the source Test Pattern to the top of the list. The search bar will not remove sources that don’t match the search term.
If you can’t find a source in the list, make sure that the source is running, that the source’s device is reachable in the network and that no firewall is blocking the connection.
If you encounter problems with a source, I recommend installing the official NDI® Tools and trying the Test Patterns generator. This source is known to work with LiveScopes.tv and can help to determine if the problem is with the software or the source.
Reference Frames
Capture Reference Frame
When clicking the Capture Reference Frame button, the software will save the current frame as a reference frame. This reference frame can be found by opening the frame browser and selecting the folder corresponding to the current date.
Folders are named in
YYYYMMDDformat.
After selecting a reference frame, you will be able to move the split screen position by clicking and dragging the split screen handle. You will notice that the split position also moves in the scopes. You can also flip the side of the reference frame by clicking the Flip Horizontal button.
Disable the reference frame comparison by clicking the Disable Reference Frame button.
Starting with Version 2.0.0, reference frames are compressed using gzip before being saved. This reduces the disk space needed to store the reference frames by a lot.
You can find the location of the saved reference frames by clicking the folder icon in the frame browser. The files are usually stored in
..\Documents\LiveScopesTV\stillsand end in.lsstill.gz
Custom Reference Frame Folders
Available since version 2.1.0
By pressing the Add new Directory button in the frame browser, you can create a new folder to store reference frames in. This way you can organize your reference frames by project, source, scene or any other way you like.
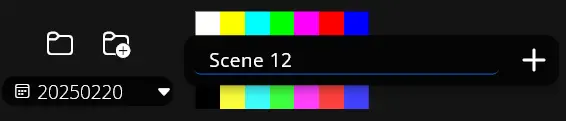
You can then select the folder by clicking on it in the dropdown menu.
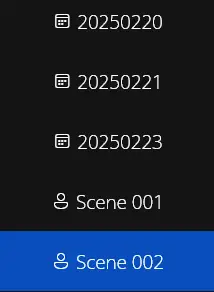
As you can see, folders in the YYYYMMDD format will have a calendar icon next to them. Custom folders will have a person icon.
When capturing a reference frame while a custom folder is selected, the reference frame will be saved in the selected custom folder instead of creating a new YYYYMMDD folder.
Exporting Reference Frames
Available since version 2.0.3
When opening the Frame Browser and selecting a reference frame, you will see the Save Image button. Clicking this button will prompt you to save the reference frame as an image file.
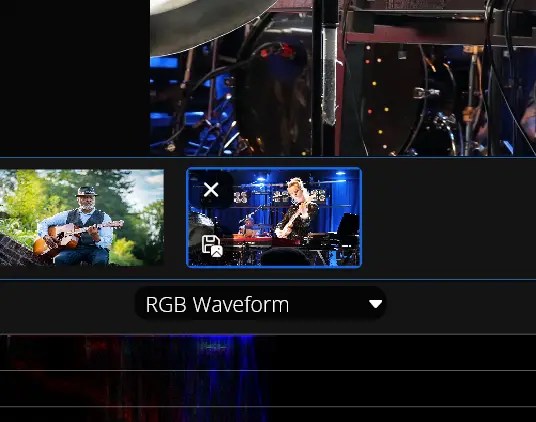
Supported image formats are:
PNG, JPEG, BMP, TIFF, GIF, TGA
Make sure to add the correct file extension to the filename when saving the image. Otherwise, the software won’t know which format to save the image in.
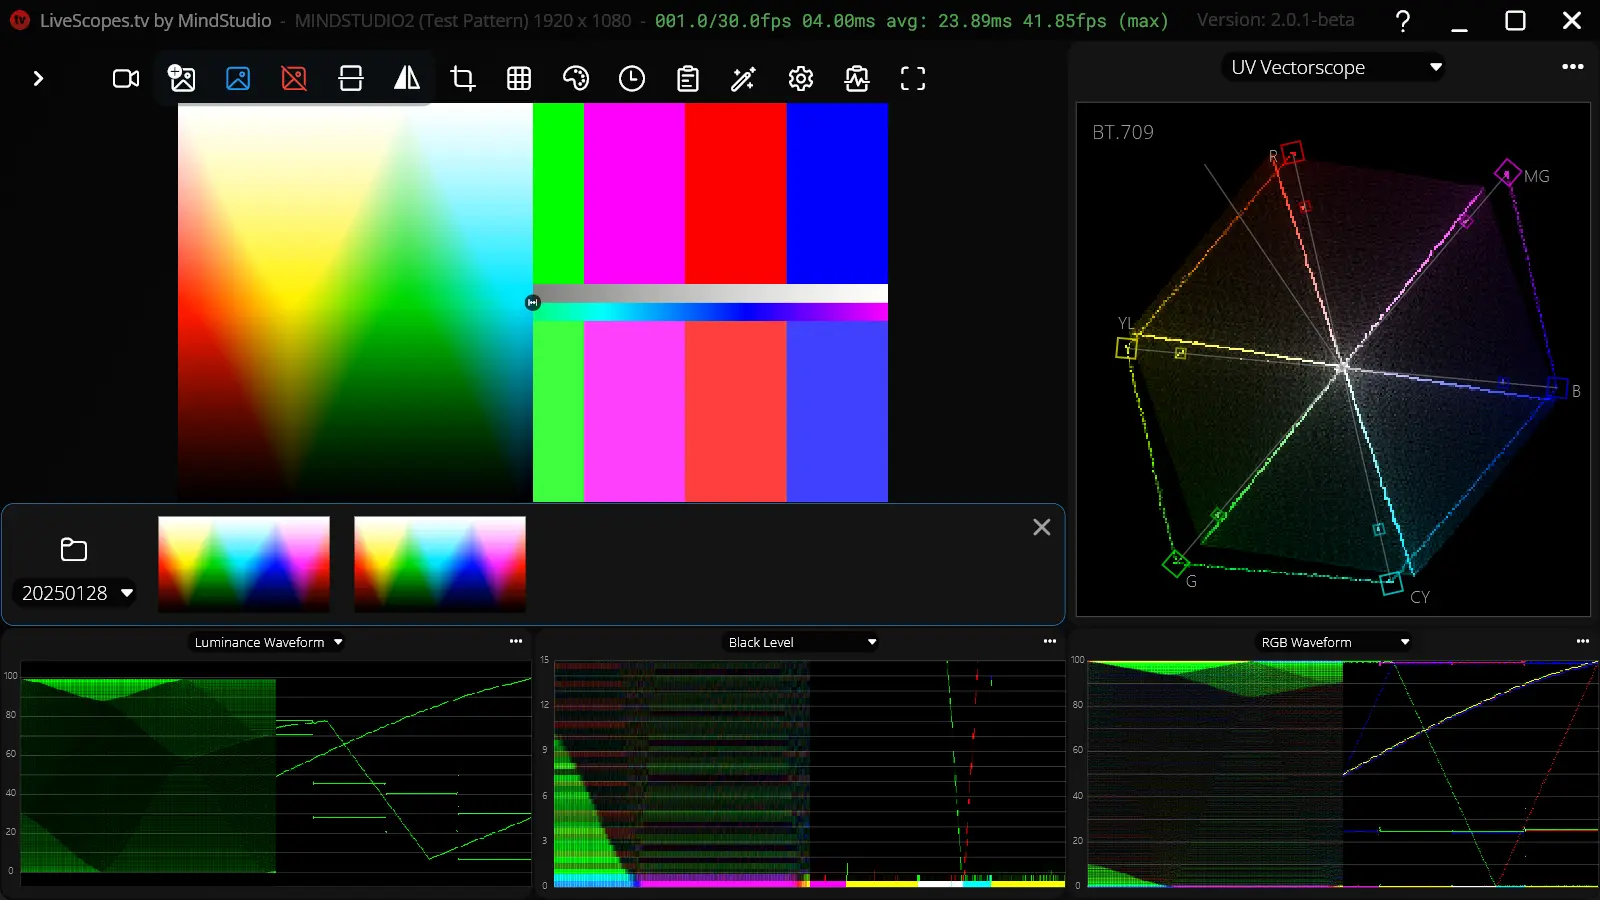
Scopes
The software comes with a variety of scopes that can be selected via the dropdown menus above each scope. There are waveforms at the bottom and square scopes to the right.
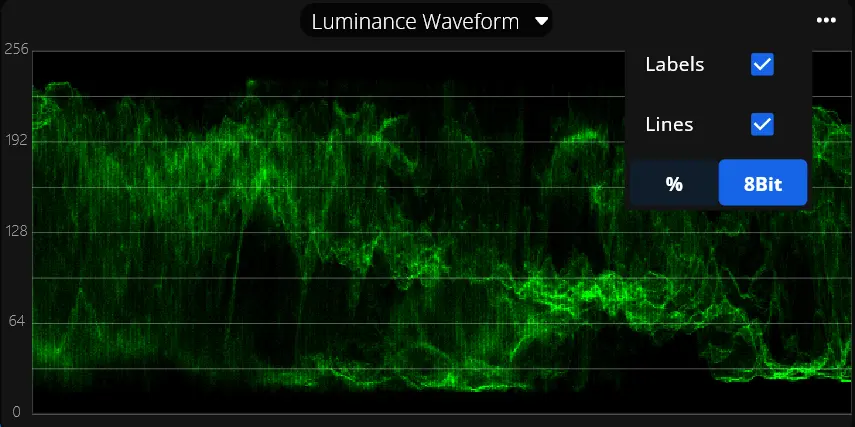
Each waveform also has a … button that opens a context menu with additional options. You can toggle the labels and lines and also switch the scale between 0 - 100% and 0 - 255 (8-Bit).
Luminance Waveform
Shows the luminance values of the video feed. This is useful to check the exposure of the video feed.
For the luminance waveform, the % scale maps to 16 - 235 instead of 0 - 255.
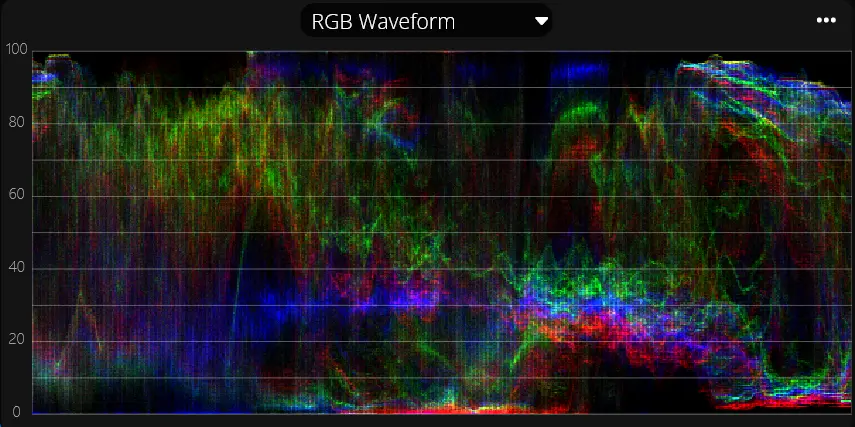
RGB Waveform
Shows the RGB values of the video feed overlayed. This is useful to check the color balance of the video feed.
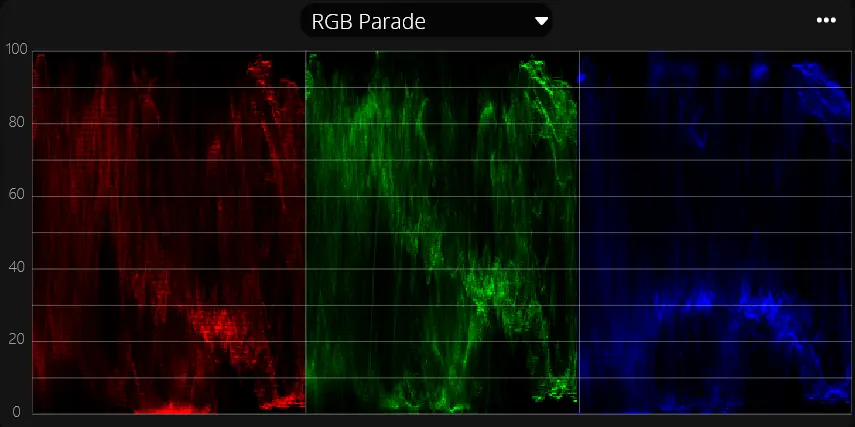
RGB Parade
Shows the RGB values of the video feed separated into three scopes.
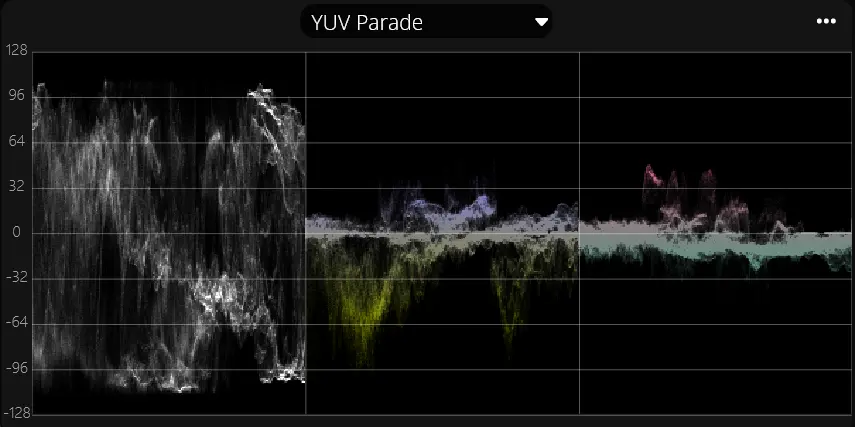
YUV Parade
Shows the YUV/YCbCr values of the video feed separated into three scopes. The Y values are the same as the luminance waveform.
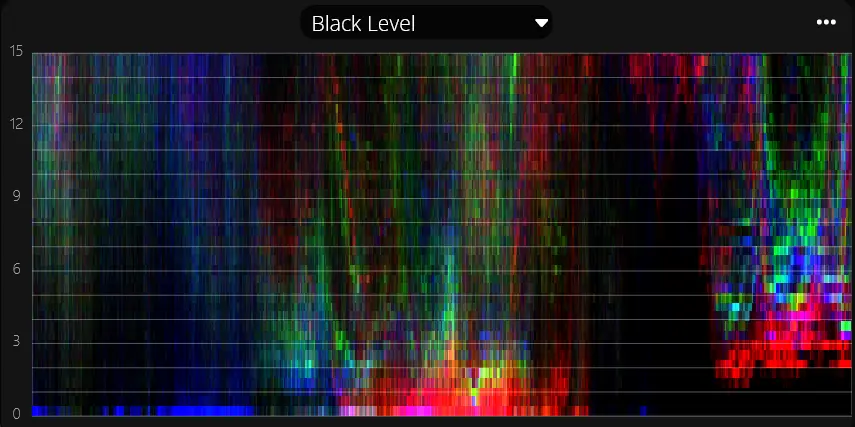
Blacklevel
The same as the RGB waveform but zoomed in to the bottom 15% of the video feed.
Vectorscope
Maps the UV/CbCr values to the x-y plane. This creates a color wheel where the hue of the pixel is represented by the angle and the saturation by the distance from the center. In the top left corner it also shows you the currently selected color space (this can be changed in the settings).
Using the … menu you can change the scale/zoom of the vectorscope. This might be used when the color vectors are too close to the center of the vectorscope. You can also toggle whether the color vector boxes are colored or not.
The vectorscope also contains a skin tone line between red and yellow which can be used to check if skin tones have the correct hue and saturation.

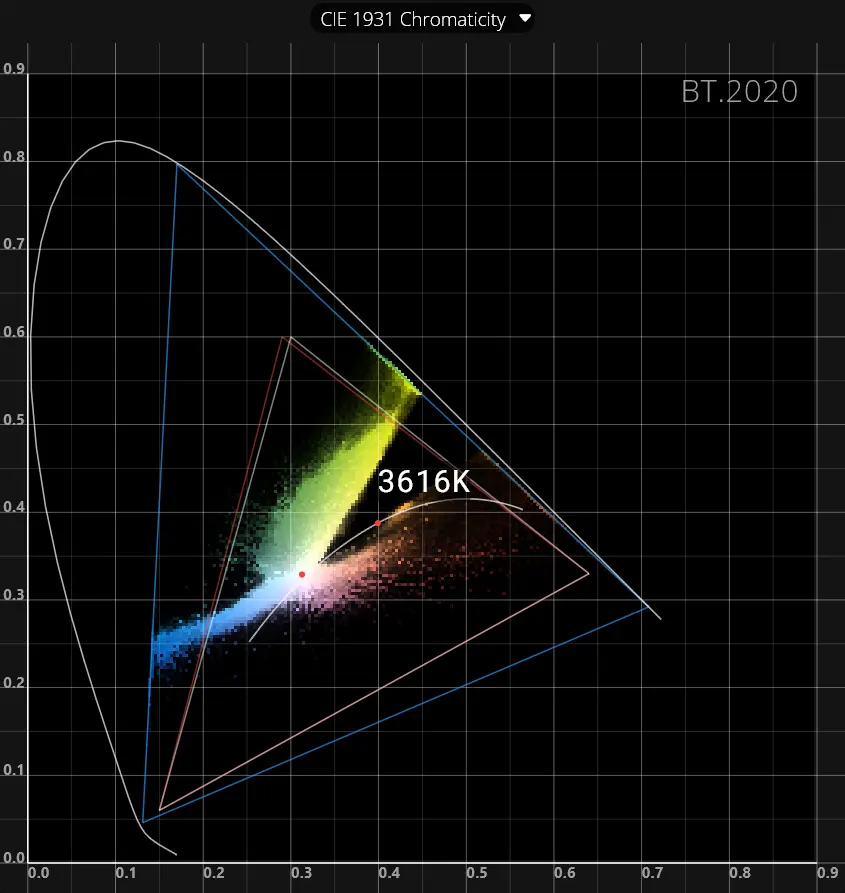
CIE 1931 Chromaticity Diagram
Shows the color values of the video feed in the CIE 1931 color space. This is useful to check where the colors of the video feed are located in the color space.
The outer white curved line represents the spectral locus. This is the line where all the colors of the visible spectrum are located. The red D65 point is the white point of the color space and represents the color of daylight (6500K).
The white triangle represents the BT.709 color space. The red triangle represents the BT.601 color space. The larger blue triangle represents the BT.2020 color space.
The inner white curved line represents the Black-Body Locus. This is the line where all the different temperatures of “white” light are located.
You can hover over the diagram to see the temperature of of the closest point on the black-body locus in kelvin.
Double Diamond
This scope is inspired by the Tektronix Double Diamond Display which is nicely explained in this video.
It maps the green-blue and green-red coordinates to two diamonds. A grayscale image will show up as a vertical line in the middle of the two diamonds. The center of the scope represents black, while the top and bottom corners represent white. Using this scope you can easily determine if the colors are balanced correctly across different brightness levels.

Rectangle Mask
The rectangle mask can be used to crop the video feed. This is useful whenever you want to check the colors of a specific area of the video feed e.g. the face of a person, a green screen, or a white area.
After enabling the rectangle mask, you can move the mask by clicking and dragging the center of the mask. You can also resize the mask by clicking and dragging the edges of the mask.
You will notice that only the area inside the mask is processed by the scopes and waveforms.
When the mask is enabled there will be another reset button in the toolbar. This button will reset the mask to the center of the video feed. You might need to press this after switching video resolutions.
Alpha Background
The alpha background can be toggled by clicking the Alpha Background button in the toolbar. This will put a checkerboard pattern behind the video feed. This is useful to check if the software is processing the alpha channel correctly.
False Color
By enabling the False Color mode, the video feed will be colored based on the brightness of the pixels. This makes it easier to check the exposure of the video feed and quickly shows you if parts of the video feed are overexposed or underexposed.
The false color scale on the left side of the video feed shows you which colors represent which brightness levels.
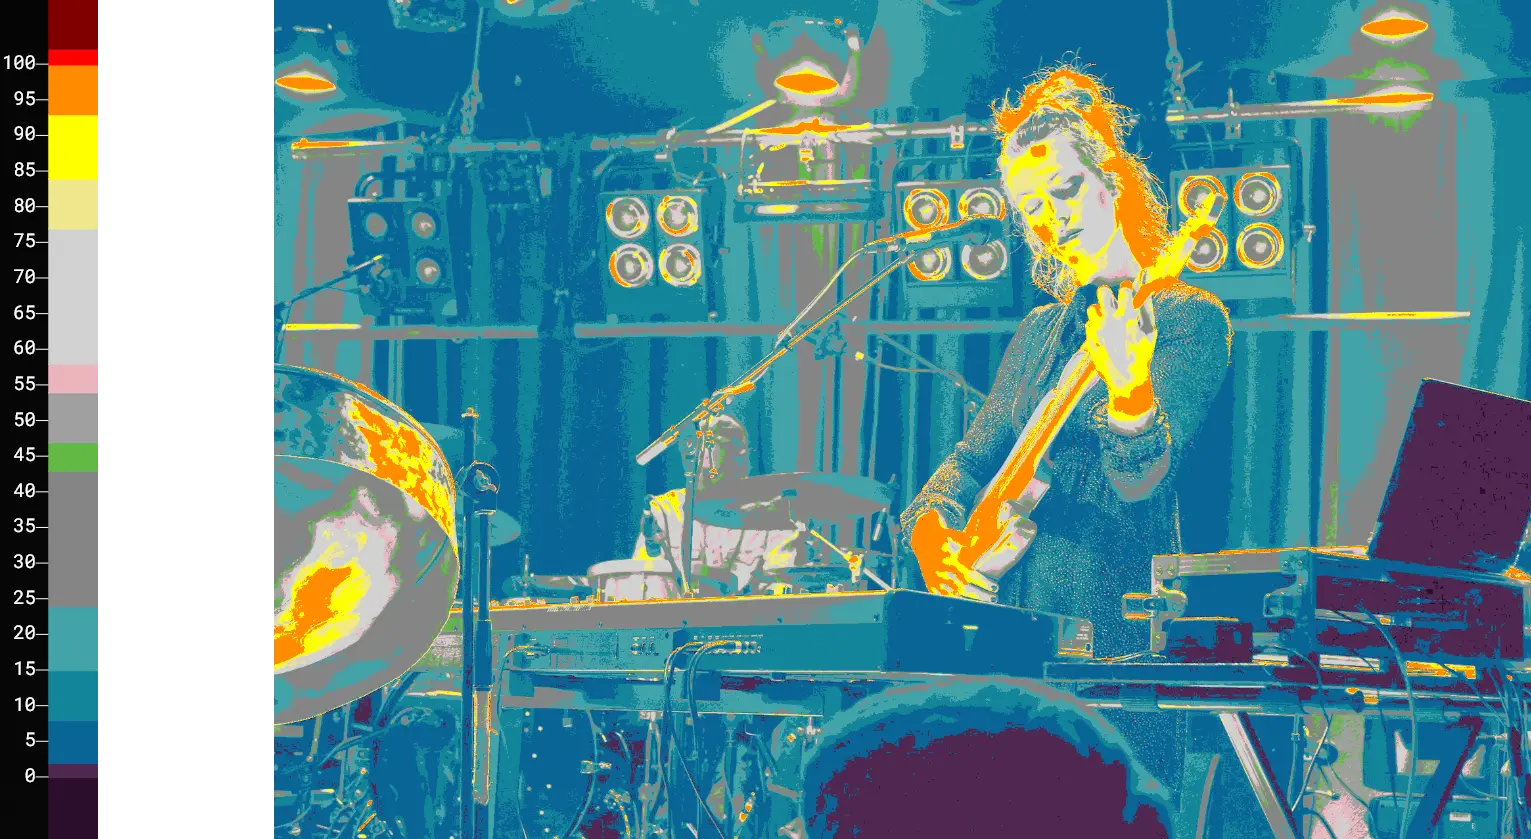
The PRO version of LiveScopes.tv has multiple false color scale presets to choose from. You can also create your own false color scales.
Timecode
The Timecode button in the toolbar will show the current timecode embedded in the video feed.
NDI® sources have a timecode using milliseconds that will show as
HH:MM:SS.sssinstead of the usualHH:MM:SS:FFformat.
Metadata
The Show Metadata button in the toolbar will show the metadata embedded in the video feed. This also display the contents of NDI® metadata frames which is usually text in XML format.
The metadata window will show
- Source Type - NDI® (Webcam and DeckLink sources are available in the PRO version)
- Source Name - The name of the NDI® sending instance
- Source IP:Port - The IP address and port of the NDI® sending instance
- Resolution
- Framerate
- Aspect Ratio
- FourCC - The FourCC code of the video feed, e.g
UYVY,BGRA,YUV2, etc. - XML Metadata - The XML metadata embedded in the video feed. This can contain additional information about the video feed.
Color Filter
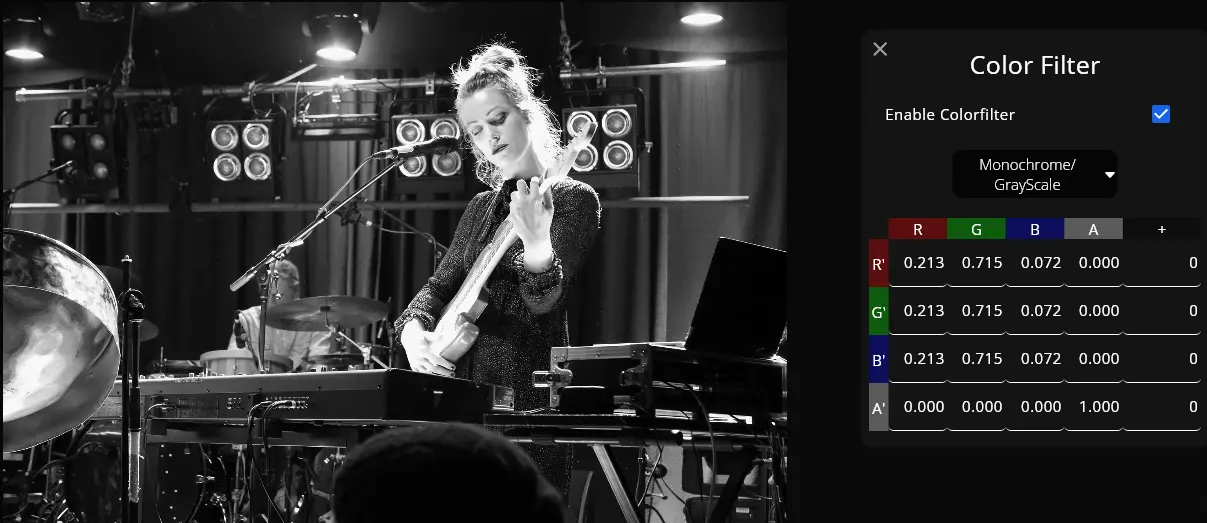
The Color Filter button in the toolbar will open the color filter menu. Here you can select from a variety of presets or create your own filter from a 5x4 matrix.
The color filter will only be applied to the video preview and not to the scopes or waveforms.
Presets like only red/green/blue allow you to quickly check a single color channel of the video feed.
The 5x4 matrix works as follows:
\[\begin{equation} \begin{bmatrix} R\\G\\B\\A \end{bmatrix}_{out} = \begin{bmatrix} a_{00} & a_{01} & a_{02} & a_{03} & a_{04}\\ a_{10} & a_{11} & a_{12} & a_{13} & a_{14}\\ a_{20} & a_{21} & a_{22} & a_{23} & a_{24}\\ a_{30} & a_{31} & a_{32} & a_{33} & a_{34} \end{bmatrix}\cdot \begin{bmatrix} R\\G\\B\\A\\1 \end{bmatrix}_{in} \end{equation}\]or as code:
1
2
3
4
R_out = a00 * R_in + a01 * G_in + a02 * B_in + a03 * A_in + a04
G_out = a10 * R_in + a11 * G_in + a12 * B_in + a13 * A_in + a14
B_out = a20 * R_in + a21 * G_in + a22 * B_in + a23 * A_in + a24
A_out = a30 * R_in + a31 * G_in + a32 * B_in + a33 * A_in + a34
Try the different presets and notice how the matrix changes. You can also create your own matrix and see how the video feed changes.
The PRO version of LiveScopes.tv also supports LUTs (Look-Up Tables) which can be used to apply complex color corrections to the video feed.
Keyboard Shortcuts
The software has a variety of keyboard shortcuts to quickly interact with the software. You can find the keyboard shortcuts by clicking Keyboard Shortcuts in the Settings menu or by pressing H on your keyboard.

Logs
If Enable Logging is checked in the settings, the software will log information about the software’s operation. You can view the logs by clicking the Logs button in the toolbar. The software will also produce a log file called latest.log in ..\Documents\LiveScopesTV\logs.
If you encounter problems with the software, you can send the log file to the developer to help diagnose the problem.
Help Menu
The Help menu which you can find by pressing the ? button in the window title contains the following resources:
- Changelog - Opens the changelog within the software. The changelog contains changes for the pro and free version since they are developed as a single codebase.
- Documentation - A link to this documentation.
- Chat, Support and News - A link to our community subreddit r/livescopestv. Here you can ask questions, report bugs, and get the latest news about the software.
- Homepage - A link to the homepage of the software. broadcasttools.de
- NDI® Version - shows the version of the NDI SDK which the software currently uses with a link to the NDI® Website where you can download the NDI® Tools and read more about NDI®.
- About - Shows the version of the software, information about the developer and more:
- Privacy Policy
- End User License Agreement - A copy of the one you agreed to when installing the software.
- Third Party Licenses - A list of third-party libraries used in the software and their licenses.